
5 Essential Elements of a Successful Actors Website
6 min read
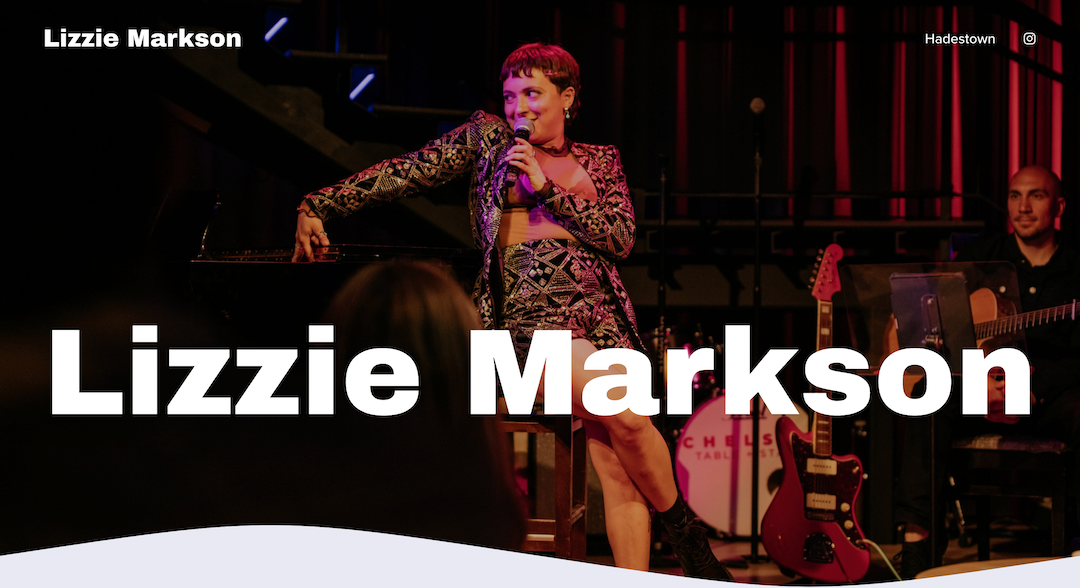
If you’ve spent hours searching online about how to make your own actors website you aren't alone, I’ve been there too. And just like you, I found the direction lacking and all the top articles were geared towards portfolios for web developers, designers, and techies. I was looking for things that were relevant to me as an actor. Eventually, I figured it through trial and error on my own and now I am going to boil it down to 5 essential things I’ve found that are consistent across all awesome actors' websites, from Helen Mirren to Lizzie Markson. (Seriously, they have such a cool site and it’s made on Squarespace check it out!).
So without further ado here is what you need to get started. Remember, websites are a work in progress, they’re never “finished”, just like that play or film you’ve been working on. You’re always allowed to update your site later! Just getting started is the hard part.
1. Your Contact Details
Do you like filling out forms?
Me neither.
Pretty, pretty please, LIST YOUR EMAIL ADDRESS on your website. I’m not talking about having a form, (< also do this). But be sure to have your email address listed and easily copyable so people can email you directly.
Should you include your phone number?
Maybe. This one is up to you.
Also, while Social Media may be the king when it comes to connecting online, the rules around integrating social media into your website well, and by well I mean in a productive and professional way, is complicated. For now, you should include your professional email where people can reach out to you for collaborations.
As a general rule if your friend would reach out to you on it, don't put it in here! After all, you’re a professional! If you have a business or professional social media presence then go ahead.
If you’re represented, THEN and ONLY THEN (and maybe not even then…) you can remove your contact details. I personally don’t because I still want people to be able to contact me directly for projects that are outside of my agents' scope, and I want to appear friendly and accessible. Nobody wants to work with an actor who is hard to contact and communicate with.
(If you’re Helen Mirren, sure, don’t put your contact details. You’d get bombarded with a crazy number of emails (probably from me…), and that’s going to be really detrimental to everyone's lives. But until then, be easy to contact.)

2. Your Headshots, Reels and other Demos
This is the most time-consuming part. Here you should add all of your media, including headshots as well as demo reels. Be sure to show your best work, ideally uploaded directly or embedded YouTube videos. (Vimeo is fine but it does have some embed issues and can force annoying logins for your visitors. Not so cool.). Multiple videos are ideal here. Smaller bite size clips are better than having an 18-minute video that a visitor has to scrub through.
Splice up your video into small 1-2 minute clips and title them according to their style and genre.
That way your audience can quickly watch what is relevant to them, and you get to show off your best clips! Put these first, 80% of people will click on the first 1 or 2 links and will watch the first 10 seconds max. Scary stats, I know, so be really ruthless with what you pick and when the clips start.

3. Your Resume & Representation
The word version of your work. If you don’t have reels, then this is a great way to add some content to your site. Just like any other profession, simple clean and LEGIBLE formatting is key here. I advocate for non-calligraphy typography and ample spacing around gigs. If you don’t have demo reels and are just starting out, I also say you can elaborate more than just saying who you played. Add in other details like production time, if it was a play, list where it was on, and for how long etc. Add any accolades the show received or you have received as well here.
This is also where you will also name-drop your representation if you have it, including a link to their website and contact details. No need to write a bio on them but make sure that they have their own section. This is so that visually they stand out on your page and make it easy for someone who wants to work with you to find their contact! Nothing is worse (okay maybe cold coffee) than doom-scrolling someone’s website trying to figure out how to contact them. Don’t set this trap for people, please.
Hot Tip: I add my contact details and my agents details in the footer of my website so it appears on each page and is easily accessible. Make it easy for people to contact you!

4. Your About Page
No portfolio website of any variety is complete without an About page. After all, the entire website is about you! The About page (or section if you’re creating a 1-page site) is also one of the more dreaded parts as literally no one I have ever talked to likes writing about themselves. The biggest thing to avoid here is listing out what’s on your resume. We know that. We’ve just read it or are about to. Your About section or page is where we get a glimpse of your personality, so don’t be afraid to have fun here.
Hate writing about yourself? Same!
Here are some prompts to help you get past that.
If you sat down with a fan for 5 minutes what would you tell them?
Great, now condense that into a minute. Make sure that is in your bio.
I know thinking of a fan might sound cringe, BUT it helps to think about talking to a fan instead of a potential casting agent or director like you might be tempted to because doing the latter will make you more stressed and your result is likely to sound very “selly”. It is much easier to talk to someone (even in our head) who is already on your side. Give yourself a break here.
Ask a friend how they would describe you.
If that embarrasses you then just ask them for 3 things that they thought were cool that you did then try to build 3-4 paragraphs around that.
If both of those fail, I find that picking up my phone, opening the voice memo app and recording myself speaking out loud my answer to “who are you and what do you do”, is the easiest way to get authentic sounding copy. (Copy = copywriting, aka. the text on your website.) Then take this recording and transcribe it.
5. Your Behind the Scenes photos or videos!
I have to admit this is my favourite section on an actors websites! This is where you get to pull back the curtain a bit. Ideally, this is a page or section where you can put anecdotes about projects you’ve worked on, and tell people what you are currently working on or what festivals you went to. If you are doing any new courses or training you can also put this here (Motion capture? Horseback Riding?).
The only caveat with this page is that it does need to be actively maintained. It’s not quite as time-consuming as a blog, you don't need to post every week or even every month but it doesn’t look good if the last thing on this page is from 2 years ago. Add a reminder in your calendar to update this section or page every 6 months.
Having a Behind the Scenes section is great if you’re not a pro at keeping your instagram posts “branded” but want to add a bit of personality to your site. It’s also a chance to showcase specific talents you have that make you stand out in a more interesting an visual way than as a single line or word on your resume.